|
 The
process The
process
Lots of people ask me “How do you do your work?”
and it’s not that easy to explain. There are many steps
involved in the beginning imaging procedures, and even more
ways to artistically enhance the sometimes washed-out appearance
of the original transfers. Below is a basic list of the
equipment needed and a brief explanation of the standard
transfer methods. This is followed by what I have developed
to bring out the rich colors seen in my Polaroid framed
slide transfer prints.
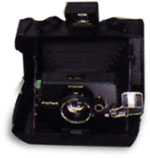
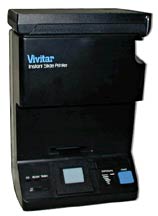
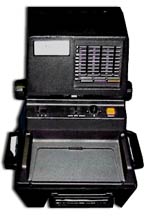
The equipment and film
First, you need access to either a Polaroid camera that
uses peel-apart films, like the Polaroid Propack, or a slide
printer, such as a Daylab or a Vivitar. You can usually
find the equipment at a camera store, or sometimes you can
get lucky and find used equipment from an Internet auction
site, such as EBay. For beginners, a slide printer is usually
the best way to go, unless you are only going to do emulsion
transfers, which is explained below. The best films to use
are any of the Polacolor ER peel-apart films that have type
numbers that end in nine, such as 669, 559, 809, and 59.
Polaroid Emulsion Transfer
This process uses the positive print of the peel-apart film.
After exposure, develop the film for a minute at room temperature
then separate the positive and negative. For best results
you need to let the positive dry 12 to 24 hours. When dry,
cover the back of the positive with vinyl-adhesive paper
leaving some extra around the edges. Heat a tray of water
to 160°, and immerse the positive in the water face
up for approximately 4 minutes until you see the emulsion
start to lift. Remove the print from the water with tongs,
and then place in a tray of cold water. Under the water,
use your thumb to gently push the emulsion from the paper
backing of the print. Make sure to rub off the gel-like
substance from the back of the emulsion. Afterwards, take
cold pressed watercolor paper and place in water under floating
emulsion and lift them both out. If wrinkles occur, you
can gently dunk the paper and emulsion in and out of the
water to alleviate them. Let the paper drain off, then place
on a flat surface and manipulate the emulsion until you
are satisfied with how it looks. If it starts to dry out,
just mist with cold water. Starting from the image’s
center, use a wet brayer roller to flatten it out, then
either dry it on a screen or clothespin it to a line.
Polaroid Wet Transfer
In this process, time is of the essence as you are using
the negative instead of the positive of the peel-apart film.
Because of the time constraints most people use a slide
printer. The first step is to expose the film in the slide
printer. After this, soak 150 lb. watercolor paper in 85°
water until it is limp, around 20 seconds. Lift from water
and let drain, then place on hard surface and gently squeegee
the excess water. Pull the large tab on the film straight
out from the slide printer without stopping which exposes
the developing chemicals. Within 15 seconds peel apart the
film and press the negative face down on the wet watercolor
paper with your hand. With medium pressure, roll the negative
5 to 6 times with a brayer roller. Float the paper negative
side up in 105° water for 2 minutes while the transfer
develops. Remove from water and on a flat surface slowly
peel back the negative from the paper and let dry on a screen.
You can either mat and frame as they are, or hand tint to
brighten the sometimes washed-out colors.
The artistic part
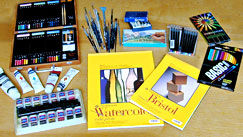 There
are many of ways to enrich these transfers, from using soft
colored pencils and felt-tip markers to hand-tinting with
Dr. Martin’s water colors or digitally enhancing with
a computer. It just depends on the final print and what
your personal likes are. I prefer incredibly bright colors
so I start with an original slide, print it, then hand tint.
If the piece turns out, I scan it into a digital file, sometimes
enhance it further using Photoshop, then print it on a large
format 6 color process printer that can handle acid-free
art paper. The prints are touched up further, numbered and
signed, then matted with non-acid materials. Some are left
this way so that people can select their own frames. Others
are mounted in frames that I hand-paint to complement them.
I have found that this method is the most economical because
producing originals is very costly and it takes so much
time that each one would be outrageously expensive. Another
way to do the process is to use photos shot with a digital
camera, or digital photos that you own the rights for. Using
a computer and a color printer, you can print them, then
reshoot them with your Polaroid camera. This is best done
with natural lighting. There
are many of ways to enrich these transfers, from using soft
colored pencils and felt-tip markers to hand-tinting with
Dr. Martin’s water colors or digitally enhancing with
a computer. It just depends on the final print and what
your personal likes are. I prefer incredibly bright colors
so I start with an original slide, print it, then hand tint.
If the piece turns out, I scan it into a digital file, sometimes
enhance it further using Photoshop, then print it on a large
format 6 color process printer that can handle acid-free
art paper. The prints are touched up further, numbered and
signed, then matted with non-acid materials. Some are left
this way so that people can select their own frames. Others
are mounted in frames that I hand-paint to complement them.
I have found that this method is the most economical because
producing originals is very costly and it takes so much
time that each one would be outrageously expensive. Another
way to do the process is to use photos shot with a digital
camera, or digital photos that you own the rights for. Using
a computer and a color printer, you can print them, then
reshoot them with your Polaroid camera. This is best done
with natural lighting.
Where to find out more
Want to make some prints and develop your own techniques?
Here's a couple of really good books:
|